Bouncing ball
8 years ago
This time, it is going to be a lot more dynamic. We are approaching a full game!
Bouncing all over the place
Length 20 minutes
Level Complete beginner
Prerequisites
- Access to a Gamebuino META
- Completed the Gamebuino META setup workshop
- Completed the Hello World and Tally counter workshops
In the previous workshop, you made a tally counter. You learned to use variables of type int. We also looked at if statements and conditions to interact with the player. Finaly, we used a function to draw rectangles to the screen.
So in summary, you made a rectangle move by pressing buttons. So we are not far from having a Pong paddle ;)But a Pong game without a ball is not very fun. This is why we will now code a bouncing ball.
Moving Forward
For our bouncing ball, we would need a new variable called positionX, which, like you guessed, stores the X (or horizontal) position of our ball. While we are at it, let's add another variable called speedX which keeps track of the speed of our ball along the X axis.
Now, look at this code: it makes the ball move forward on it's own!
#include

int positionX = 32;
int speedX = 1;

void setup() {
  gb.begin();

}

void loop() {
  while (!gb.update());
  gb.display.clear();

  positionX = positionX + speedX;

  gb.display.print("positionX: ");
  gb.display.print(positionX);
  gb.display.print("\nspeedX: ");
  gb.display.print(speedX);

  gb.display.fillRect(positionX, 32, 4, 4);
} 
About the screen and rectangles
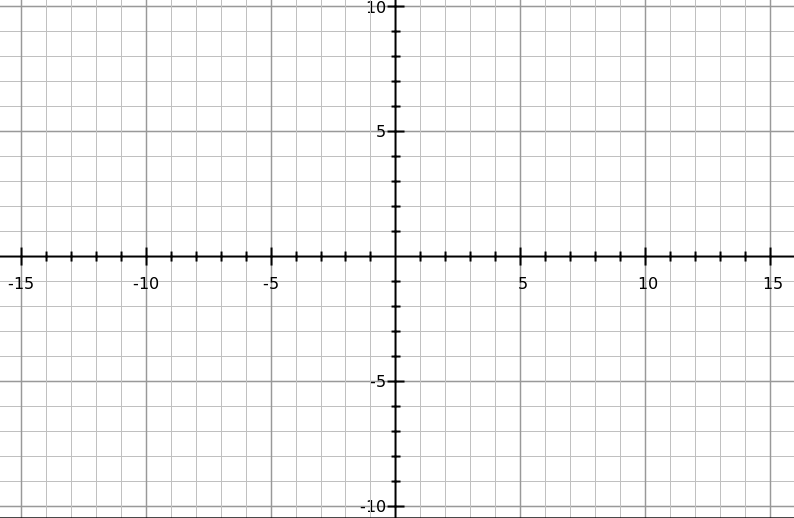
When you were taught coordinates, you probably saw something like this where the center is where X and Y are equal to zero, and that X and Y get bigger when you go to the up and to the right. But for screens, this isn't the case.

Coordinates on the Gamebuino META's screen, just like all other screens, have their origin in the upper left corner. Not only that, but the Y values get bigger when you move downwards (the X values grow when moving to the right, just like a regular graph).
This means that the opposite corner (bottom right) is at (gb.display.width() - 1, gb.display.height() - 1).
Now why did we subtract 1 to get the opposite corner? Well it has to do with the fact that the first pixel has a value of 0 on both axes. Let me put it this way: if you had a screen with only four pixels, and the the first pixel's coordinate was 0, what would be the coordinate of the forth (last) pixel?

Here you can easily see that the forth pixel has a coordinate of 3, not 4. Well the same thing happens with you console's screen! The rightmost pixel has an x coordinate equal to gb.display.width() - 1. And the same thing goes for the lowest pixel.
Note: the screen's size is 80 pixels wide by 64 pixels tall. You can check the width by doing gb.display.print(gb.display.width()); in your code. Or by counting ;). Also note that even if you know this, you should not use 80 instead of gb.display.width(), because it is less implicit and is a sort of light obfuscation.
While we are on the topic of screen and positioning, let's take a closer look at how the gb.display.drawRect() function works. First, here is its structure:
gb.display.drawRect(int x, int y, int width, int height);

Just like the screen, the X and y passed as parameters are the position of the top left corner of our rectangle. So, knowing this, the bottom right corner of the rectangle has a position of (x + width - 1, y + height - 1).
Now that this is clear, try to draw the ball higher up the screen. How about drawing the ball so that it is right above the bottom of the screen.
Keeping The Ball In View
Let's launch our little game and see what happens...Hey! the ball just flies off the screen! Well actually that's expected, as we did not use conditions to stop it. So it just keeps going, even off screen. In that case, how could we keep the ball inside of our screen? Well, let's take a look at this algorithm.
If the ball reaches the right edge
Then go left

If the ball reaches the left edge
Then go right
So there are a couple of things we must look at:
- How do we make it so that the ball goes towards the left?
- How do we detect the edge of the screen?
Now, before I give you the solution, try to figure it out. Here are a few hints:
Think about what speedX does. Play around with its value.
Coordinates on the screen range from 0 to gb.display.width(). A value of 0 coresponds to the leftmost pixel, and gb.display.width() is the rightmost pixel.
If you are still stuck, here's what we did:
#include

int positionX = 32;
int speedX = 1;

void setup() {
  gb.begin();

}

void loop() {
  while (!gb.update());
  gb.display.clear();

  positionX = positionX + speedX;

  // If the ball reaches the left side of the screen
  if(positionX < 0){
    // Go right
    speedX = 1;
  }

  // If the ball reaches the right side of the screen
  if(positionX > gb.display.width()){
    // Go left
    speedX = -1;
  }

  gb.display.print("positionX: ");
  gb.display.print(positionX);
  gb.display.print("\nspeedX: ");
  gb.display.print(speedX);

  gb.display.fillRect(positionX, 32, 4, 4);
}
It's your turn!
If the ball only moves left and right, this is not going to be a very exiting Pong match :P Why not create positionY et speedY so that the ball can now move across the screen. But just like the left-right movement, you will need to detect the edge (with gb.display.height()) and keep the ball inside the screen. Go ahead and give it a go!
Make us proud on social networks with #gamebuino #bouncingball , we go through them all the time;)
Solution Example
If you are running out of ideas, or need a little guidance, take a look at what we wrote :)

#include


int positionX = 32;
int speedX = 2;
int positionY = 32;
int speedY = 1;
int ballSize = 8;


void setup() {
  gb.begin();


}


void loop() {
  while (!gb.update());
  gb.display.clear();


  // Update horizontal position
  positionX = positionX + speedX;


  // If the ball reaches the left side of the screen
  if(positionX < 0){
    // Go right
    speedX = 1;
  }


  // If the ball reaches the right side of the screen
  if(positionX > gb.display.width() - ballSize){
    // Go left
    speedX = -1;
  }


  // Update vertical position
  positionY = positionY + speedY;


  // If the ball reaches the top side of the screen
  if(positionY < 0){
    // Go down
    speedY = 1;
  }


  // If the ball reaches the bottom side of the screen
  if(positionY > gb.display.height() - ballSize){
    // Go up
    speedY = -1;
  }


  gb.display.setColor(BROWN);
  gb.display.print("positionX: ");
  gb.display.print(positionX);
  gb.display.print("\nspeedX: ");
  gb.display.print(speedX);


  gb.display.print("\npositionY: ");
  gb.display.print(positionY);
  gb.display.print("\nspeedY: ");
  gb.display.print(speedY);


  gb.display.setColor(WHITE);
  gb.display.fillRect(positionX, positionY, ballSize, ballSize);
}
By Aurélien Rodot, modified by Julien Giovinazzo
Any questions / comments / suggestions, be sure to drop a comment down below!
NEW 8 years ago
Is this like a contest?
Aurélien Rodot
8 years ago
Nah, this is a workshop to learn programming, they are all here, but only in French now : https://gamebuino.com/academy/workshops
NEW 8 years ago
Nah, this is a workshop to learn programming, they are all here, but only in French now : https://gamebuino.com/academy/workshops
soltk
8 years ago
Where is the tutorial? Your link just goes to the main page. I have my Gamebuino and cannot program for it because I do not know how.
NEW 8 years ago
"Je vais vous donner la solution, mais vous devriez essayer d'y réfléchir un peu avant de regarder. Quelques indices : essayez de jouer avec la valeur de speedX pour faire varier la vitesse. Qu'est ce qui se passe avec une vitesse de 2, de 3 ? Un vitesse négative ?
Maintenant que vous avez trouvé le truc pour faire aller la balle à gauche (n'est-ce pas ?), vous n'avez plus qu'à détecter quand positionX atteint le bord de l'écran. Les coordonnée horizontales en X vont de 0 au bord gauche à gb.display.width() au bord droit."
J'ai été déçus de cette partie, tu commence à donner des indices avant de nous avoir donner tout les outils pour réussir l'exercice.
Quand j'ai commencer à lire le premier paragraphe j'avais quelque idée en tête mais je voulais savoir comment récupérée la valeur du bord droit. Quand j'ai lut "Quelques indices:" j’espérais que ce soit la et quand j'ai vus que c’était un indice sur la résolution de l'exercices je me suis senti spoiler.
J'aime bien le concepts dans sa globalité mais au niveau du plan, je pense que ça serais beaucoup plus sympa si ça respectais un shema comme:
1/ On apprend un ou des trucs
2/ On nous proposes un exercice pour utilisé ce (ou ces) nouveau truc
3/ On nous donne tout les outils pour pourvoir réalise cette exercice (ici la fonction gb.display.width() )
4/ on nous invite a la réflexion. avec un truc du genre "Voila vous savez tout ce qu'il vous faut pour faire ca si jamais vous bloquez je vous laisse un petit indice".
5/ un petit ou des petits indices qui aide mais pas trop (ici le "une valeur negative ?" c'est plus un indice c'est la solution)
exemple:
Indice 1#: Vous aurez besoin d'utilisé les conditions if que nous avons vus dans l'atelier d'avant
Indice 2#: gb.display.width() est une constant est peut donc être utilisé dans votre programme comme un nombre
Indice 3#: Vous pouvez faire changer la balle de direction en modifiant la valeur de speedX
6/ une phrase pour dire que la solution est la " bon la je pense que je vous ai assez aider reprennez le temps de réflechir est si vous n'y arrivé vraiment pas, aidez vous de la solution"
J'ai l'impression que tu fait plus ou moins tout mais pas dans le bonne ordre.
Aurélien Rodot
8 years ago
Merci Nux pour ce retour super construit, je vais mettre l'atelier à jour en prenant des remarques très pertinentes en compte :)
NEW 8 years ago
Merci Nux pour ce retour super construit, je vais mettre l'atelier à jour en prenant des remarques très pertinentes en compte :)
NEW 8 years ago
Where is the tutorial? Your link just goes to the main page. I have my Gamebuino and cannot program for it because I do not know how.
Aurélien Rodot
8 years ago
Workshops are only in French now, you can change the language in the footer. We'll translate them soon, sit tight :)
Nux
8 years ago
Hello, you can join us on discord (link at the bottom right of the page).
We will help you and give you advice when you need.
Nux
8 years ago
note: I am not sure if you are totaly new in programing or experienced but don't know how to do with Gamebuino if you are experienced you can go to step 2.
In my opinion, the best is to start to learn C++.
So here what i personally think is the best to start on gamebuino.
Step 1: Learn C++ stuff, the best site i have found for it is this one -> http://www.learncpp.com/
I am restarting to learn c++ on this website because i was feeling to have to much gab in my knowledge
Step 2: If this is not already done follow this tutorial to get your Arduino IDE and be able to upload your sofware on it.
-> https://gamebuino.com/creations/gamebuino-meta-setup
Step 2.A: To discover new gamebuino function or understand how to use them, use the library reference here
-> https://gamebuino.com/fr/academy/reference
You can find this reference link at the bottom of the page under "ACADEMY"
--------------------------------------------------
You can do stuff on Gamebuino super early when you are learning c++ a programe saying "Hello" if you press A and "Good-bye" if you press B.
Ok this is not the game of the year but at this point you are able interect with a potential user (aka player) and you can already do some small fun game with some imagination.
And at this moment every new knowledge learn from Step 1 will open new door.
Edit: And once again if you have any issue at once of those step you can ask us on discord or on the website. I will be glad to help you if i can.
Edit2: Sorry for the long post
NEW 8 years ago
Workshops are only in French now, you can change the language in the footer. We'll translate them soon, sit tight :)
NEW 8 years ago
Hello, you can join us on discord (link at the bottom right of the page).
We will help you and give you advice when you need.
NEW 8 years ago
note: I am not sure if you are totaly new in programing or experienced but don't know how to do with Gamebuino if you are experienced you can go to step 2.
In my opinion, the best is to start to learn C++.
So here what i personally think is the best to start on gamebuino.
Step 1: Learn C++ stuff, the best site i have found for it is this one -> http://www.learncpp.com/
I am restarting to learn c++ on this website because i was feeling to have to much gab in my knowledge
Step 2: If this is not already done follow this tutorial to get your Arduino IDE and be able to upload your sofware on it.
-> https://gamebuino.com/creations/gamebuino-meta-setup
Step 2.A: To discover new gamebuino function or understand how to use them, use the library reference here
-> https://gamebuino.com/fr/academy/reference
You can find this reference link at the bottom of the page under "ACADEMY"
--------------------------------------------------
You can do stuff on Gamebuino super early when you are learning c++ a programe saying "Hello" if you press A and "Good-bye" if you press B.
Ok this is not the game of the year but at this point you are able interect with a potential user (aka player) and you can already do some small fun game with some imagination.
And at this moment every new knowledge learn from Step 1 will open new door.
Edit: And once again if you have any issue at once of those step you can ask us on discord or on the website. I will be glad to help you if i can.
Edit2: Sorry for the long post
NEW 8 years ago
@Adamko: You're right, but it would have been nice if you had concurrently given a solution. So, I do.
Fail: The ball is moving out of screen, when it reaches the right side of the the screen.
Solution: We have to subtract the size of the ball. (like in case of bottom touch)
Bugfix:
Change
// If the ball reaches the right side of the screen
if(positionX > gb.display.width()){
into
// If the ball reaches the right side of the screen
if(positionX > gb.display.width() - ballSize){
and everything works fine.
Greetz & have fun everybody
qpd00z
NEW 7 years ago
Il y a une petite erreur dans les commentaires: c'est écrit deux fois "si la balle atteint le bord gauche" (le second concerne le bord droit donc).
Aurélien Rodot
7 years ago
Merci, c'est corrigé !