Overview
Here you will learn how to configure and use META Screen Recorder for all your Gamebuino projects. This utility complements the capture tool provided with the META (accessible by the Home button), to offer you more flexibility, simplicity and features:
-
You will be able to start and stop recording the screen whenever you want. Indeed, you will no longer have to interrupt the progress of your application to start a recording. A simple and prolonged press of the Menu button is all it takes. What about stopping the recording? Briefly press the Menu button again. It's that simple!
-
You can also start and stop the recording directly in your code! This feature will allow you to record a game scene more accurately, or when specific events occur (don't miss the moment you knock out the boss anymore).
-
You can also take advantage of META's full capabilities and record your applications running in High Resolution!
To apply what you will learn here, you must of course have a Gamebuino META, which is essential to be able to make a screen recording.
Demonstration
Here is a demonstration of the recording process performed with META Screen Recorder:
Architecture
META Screen Recorder is based on two components:
-
ScreenRecorder: a C++ class that you will have to integrate into your project. This class sends all display data, during the execution of your application, to the serial port when your console is connected to your computer via a USB cable. -
screenrecord: a standalone PHP script that you will need to install and run on your computer to receive all the data sent by META on the serial port. This script decodes all the data it receives and rebuilds the screenshots that follow one another to save them in PNG files.
All you have to do is compile all these PNG files with a specialized tool (ImageMagick) to generate a beautiful animated GIF that accurately reflects what happened on the console screen.
Software environment required
To be able to use META Screen Recorder and generate animated GIFs, you will need to install the following free software on your computer:
-
PHP 7.x in version CLI (Command Line Interface), i. e. accessible from your shell.
-
The GD extension for PHP, which allows you to create images in a wide range of formats.
-
ImageMagick, which includes a library and a set of command line utilities to create, convert, edit and display images in a wide variety of formats.
We will not detail here the procedures for installing these software.
Nevertheless, you can find these procedures on the detailed documentation of META Screen Recorder.
Before continuing, make sure you have installed these different software.
To check it, open a shell and execute the following commands:
$ php -v              # displays the installed version of PHP
$ php -m              # displays the list of extensions installed for PHP
$ convert -version    # displays the installed version of ImageMagick
Downloading the ScreenRecorder class
We will now integrate the ScreenRecorder class into your C++ project.
First download the following two files (right-click + Save Link as...):
Once downloaded, move these two files in the root directory of your Gamebuino project.
Manual recording configuration
Remember that META Screen Recorder allows you to take screenshots in two ways:
- Manually, by using the Menu* button to start and stop recording.
- Automatically, by inserting instructions in the code to start and stop recording.
* You are free to modify the code of the ScreenRecorder class if you want to redefine a combination of buttons of your choice instead of the Menu button.
First, let's look at the manual recording procedure.
Remember, ScreenRecorder is able to take screenshots in the standard resolution (80x64), but also in high resolution (160x128). We will distinguish these two cases here.
For the standard resolution
Open your main sketch and insert the following lines:
#include <Gamebuino-Meta.h>
#include "ScreenRecorder.h" // <-- insert this line

void setup() {
    gb.begin();
    // your initialization
    // instructions
    ScreenRecorder::init();          // <-- insert this line
    ScreenRecorder::setForWindows(); // <-- also insert this one if you are on Windows
}

void loop() {
    while (!gb.update());
    // your instructions to
    // make on-screen plots
    // using gb.display
    ScreenRecorder::monitor(gb.display._buffer); // <-- insert this line
}
That's all you have to do!... Simple, right?
Important note about Windows
The implementation of the PHP fread function in Windows is buggy: indeed, the read buffer only reveals the accumulated data in 8K packets. Therefore, we are forced to use a trick to get rid of this bug. So it is imperative to add the following line to specify that the data reception will be done on Windows:
ScreenRecorder::setForWindows();If you are on macOS or Linux, do not add this line.
For high resolution
In the case of an application developed for high resolution, things are a little different. Indeed, you will not be able to use the traditional display methods provided by gb.display... I encourage you to read Andy's excellent article on the subject: High Resolution without gb.display, which briefly explains why this is not possible and provides you with a workaround method that consists of using gb.tft directly.
I wrote a very complete tutorial on how to deepen this technique. You can read it if you are interested (beginners may have some difficulty assimilating everything): Shading Effect in High Resolution. It will give you an in-depth understanding of how to apply this technique in your applications.
Let's take the example from Andy's article, which I slightly modified to adapt it to a division of the screen into horizontal slices. Download the SketchExampleForHD.ino code (right-click + Save Link as...), create a new directory and move the downloaded source code to it.
Then open the SketchExampleForHD.ino sketch and check that the following lines appear:
#include <Gamebuino-Meta.h>
#include "ScreenRecorder.h" // <-- loading the ScreenRecorder class

void setup() {
    gb.begin();
    gb.display.init(0, 0, ColorMode::rgb565);
    gb.setFrameRate(32);
    ScreenRecorder::init(SLICE_HEIGHT); // <-- initializes ScreenRecorder
    ScreenRecorder::setForWindows();    // <-- !!! insert this line if you are on Windows !!!
}

void loop() {
    while (!gb.update());
    for (
        uint8_t sliceIndex = 0;
        sliceIndex < SCREEN_HEIGHT / SLICE_HEIGHT;
        sliceIndex++
    ) {
        //
        // at the end of the loop...
        //
        customDrawBuffer(0, sliceY, buffer, SCREEN_WIDTH, SLICE_HEIGHT);
        ScreenRecorder::monitor(buffer, sliceIndex); // <-- screen monitoring
    }
    waitForPreviousDraw();
}
You will notice that, unlike the configuration for the standard resolution:
-
we initialize
ScreenRecorderby setting the height of the screen slices. -
and we also specify the index of the current slice during the monitoring of the screen: it is necessary for it to start the transmission to the PHP script as soon as it detects the first slice (the one of zero index).
In addition, you can see that the ScreenRecorder::monitor() is only invoked after the current slice buffer has been filled. Indeed, at that time, all the plots on the current slice that are intended to be sent to the screen through the DMA controller have been completed.
Important note
When initializing the ScreenRecorder, note that the height of the slices must necessarily be a non-zero power of 2, whose maximum value is 16… so only the values 2, 4, 8 and 16 will be taken into account. If you use a value greater than 16, the recording will simply be disabled. And if you use a value lower than 16 which is not a power of 2, you will get a rather strange recording...
I advise you to use the value 8 which only requires 2 x 2.5 = 5 KB in RAM.
Configuring automatic recording
Instead of triggering and stopping the recording using the Menu button, you can also do it automatically by inserting the corresponding instructions directly into your code. This can be very useful when you want to start or stop recording at specific times, or when certain events occur. To do this, simply insert each of the following two instructions in the appropriate places:
ScreenRecorder::startRecording();
ScreenRecorder::stopRecording();
Downloading the PHP screenrecord script
All we have to do is download and install the PHP screenrecord script on your computer to receive the data sent on the serial port by the ScreenRecorder class, and convert this data into a series of PNG files.
First download the script (right-click + Save Link as...): screenrecord
And move it to your project folder.
Note, by the way, that rather than systematically duplicating the screenrecord script in each of your project folders, it is quite possible to install it globally in your user space or within your system. This procedure is detailed in the META Screen Recorder documentation.
Then, open a shell, go to your project folder, and check that you are able to execute the script:
macOS & Linux
$ cd ~/path/to/your/project/folder # we move to the right folder
$ chmod u+x screenrecord           # we allow the execution of the script
$ ./screenrecord -h                # we launch the script with the help option
Windows
$ cd C:\path\to\your\project\folder # we move to the right folder
$ php screenrecord -h               # we launch the script with the help option
You should get the following output:
+---------------------------------------+
|    Gamebuino META Screen Recorder     |
| © 2019 Stéphane Calderoni (aka Steph) |
|     https://gamebuino.com/@steph      |
+---------------------------------------+

Usage: screenrecord [options]

DESCRIPTION

	This utility records the Gamebuino META screen in Standard & High Definition
	using communication through a serial port

OPTIONS

	-h  displays the synopsis
	-p  sets the serial port (default: /dev/cu.usbmodem141401)
	-d  sets the output directory (default: current directory)
	-b  sets the image files basename (default: frame)
	-n  sets the number of digits to number the image files (default: 4)

ANIMATED GIF CREATION

	You must have imagemagick installed to be able to generate the animated GIF file.
	For example, to generate an animation with a resolution of 160x128 pixels at 25 fps,
	simply type the following command:

	convert -delay 4 -loop 0 png_dir_path/*.png -scale 160x128 screenrecording.gif
The `-h' option tells you how to use the script.
We will focus here mainly on the following options:
-
-p: which allows you to specify the identifier of the serial port to which the META is connected -
-d: which allows you to specify the directory in which the PNG files will be saved
We will immediately create a directory to save the PNG files and avoid putting the box in the directory of your project. We will name this directory frames:
$ mkdir frames
Identify the serial port
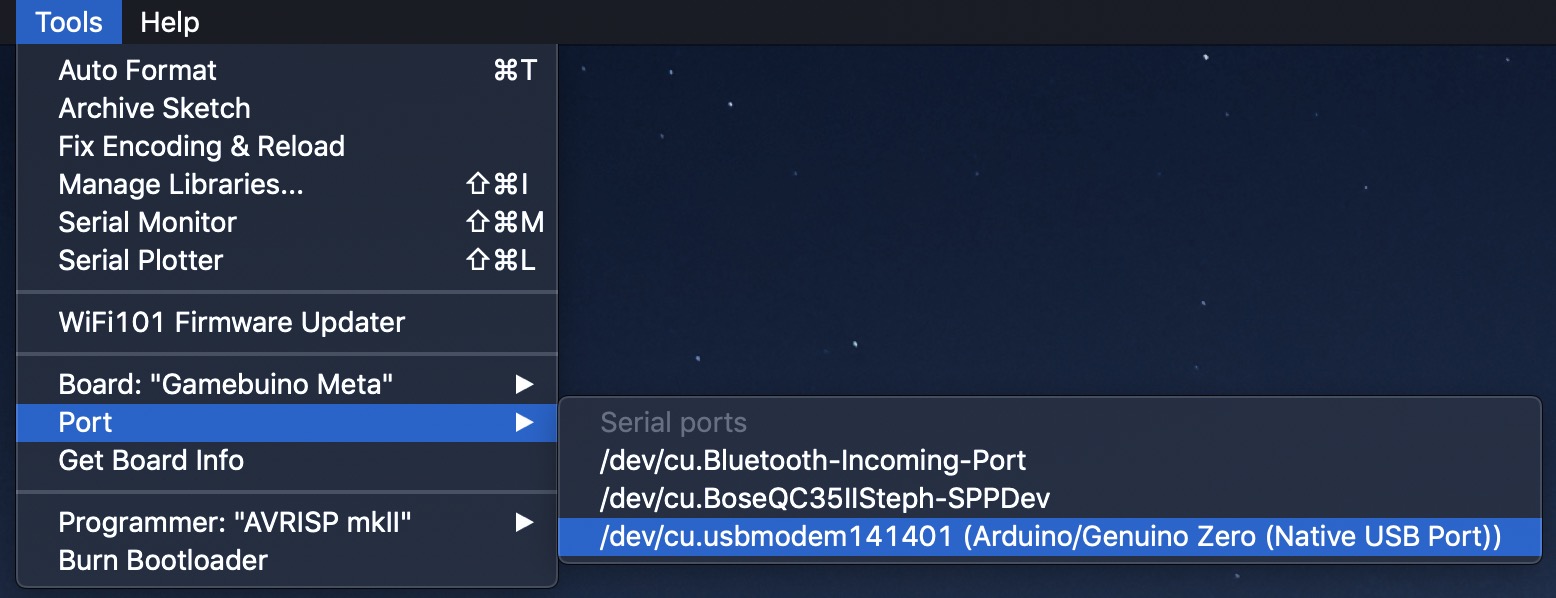
To determine which serial port your META is connected to, launch the Arduino IDE and go to the Tools menu:

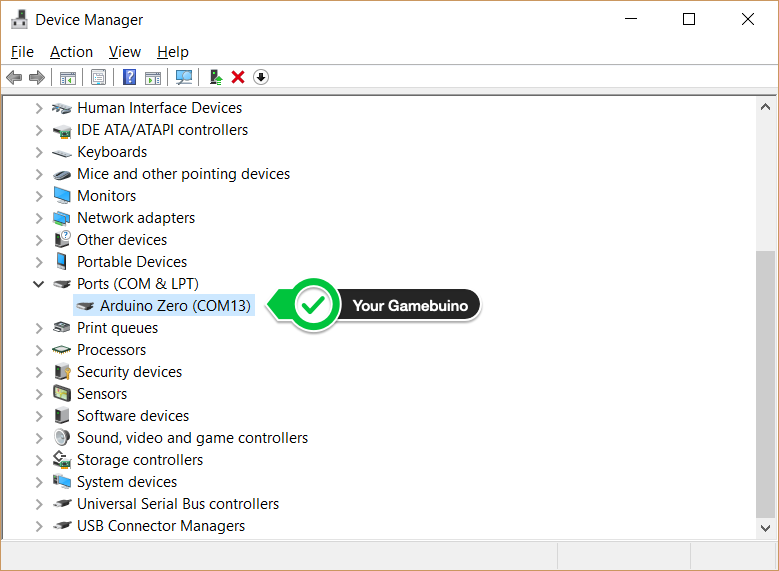
Note about Windows
You will first have to go to the Device Manager to identify the right port:

Start the recording
Compile and upload your project to your Gamebuino. Wait for the application to launch, then run the screenrecord script to listen on the serial port (specifying the correct port):
$ ./screenrecord -d frames -p /dev/cu.usbmodem141401  # <-- macOS & Linux
$ php screenrecord -d frames -p COM13                 # <-- Windows 10
Then, press and hold (at least 1 second) the Menu button on the META to start recording. You will notice that the LEDs on the console emit red flashes at regular intervals. This means that it is actually sending the display data to the serial port. At the same time, you will see on your shell that the script receives this data and records it in the order of arrival of the captures. You should observe something like that:
Start listening to the serial port /dev/cu.usbmodem141401

Waiting for data... Start screen recording in high resolution

Decoding frame 0001... saved
Decoding frame 0002... saved
Decoding frame 0003... saved
Decoding frame 0004... saved
Decoding frame 0005... saved
Decoding frame 0006... saved
Decoding frame 0007... saved
Decoding frame 0008... saved
Decoding frame 0009... saved
Decoding frame 0010... saved
.
.
.
To stop recording, briefly press the Menu... button again. The LEDs go out, the data flow stops and the script stops also:
.
.
.
Decoding frame 0100... saved
Decoding frame 0101... saved
Decoding frame 0102... saved
Decoding frame 0103... saved
Decoding frame 0104... saved
Decoding frame 0105... saved
Decoding frame 0106... saved

106 PNG files have been recorded in 160x128 (high resolution).

You must have imagemagick installed to convert these PNG files into an animated GIF file.
For a 25 fps animation, simply type the following command:

convert -delay 4 -loop 0 frames/*.png -scale 160x128 screenrecording.gif
You can already check that the script has saved a sequence of PNG files in the frames directory:
$ ls -l frames  # <-- macOS & Linux
$ dir frames    # <-- Windows
The command to create an animated GIF from the series of captures is indicated:
$ convert -delay 4 -loop 0 frames/*.png -scale 160x128 screenrecording.gif
Note on the delay option
The value N expected by the delay option is an integer that corresponds to an animation frequency of 100/N fps. So, if N=4, your animated GIF will have a frequency of 100/4 = 25 fps.
In the case of our example SketchExampleForHD.ino for high resolution, remember that we had set a framerate of 32 fps :
gb.setFrameRate(32);
So for our GIF to roughly respect this frequency, we will have to set N=3 instead. In addition, it is possible to create an image with dimensions different from those of the original capture. For example, let's go from (160x128) to (320x256):
$ convert -delay 3 -loop 0 frames/*.png -scale 320x256 screenrecording.gif
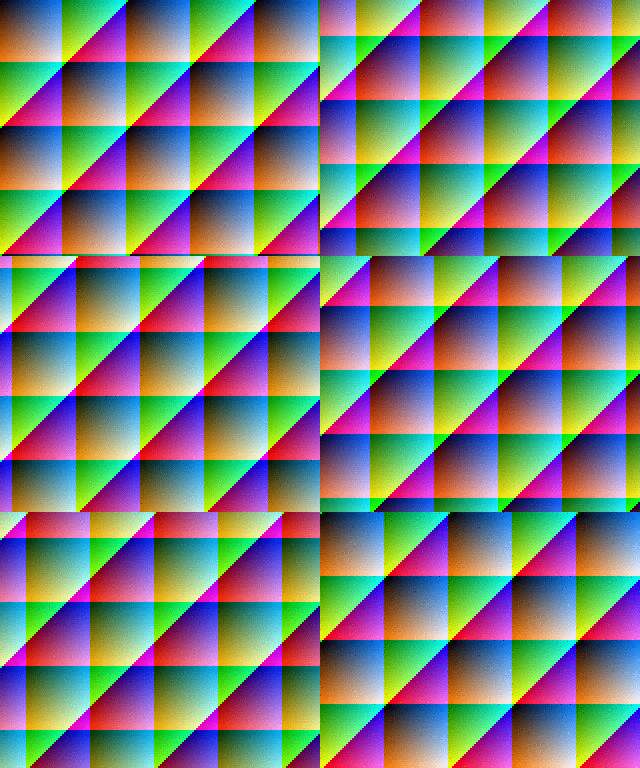
And we get the screenrecording.gif file whose beautiful content is as follows:

Note
I cheated a little... I deleted the extra frames so that the loop animation is perfectly connected... (it is enough here to keep only the first 64 frames). It is still possible to correct your recording, by deleting frames, or reordering them if necessary. Practical, isn't it?
The final word
That's it, we've reached the end of this little tutorial. You should now be able to capture animations of all your projects with META Screen Recorder. I hope you will find this tool useful. I had a great need for it myself, and I am very happy to be able to share it today. If you notice any dysfunctions, if you see possible improvements, or if you want to show me the captures you are most proud of, don't hesitate to leave me a little comment on the page of this creation!
The code of the ScreenRecorder class and the screenrecord script are available on my GitHub repository. You can modify them freely, and if you improve them, we count on you to share them with us!
