Compile and run a game
Step 3
How to put your own program on your Gamebuino!
- Turn your Gamebuino ON
- Plug it in the computer with with a USB cable
- Launch the Arduino IDE
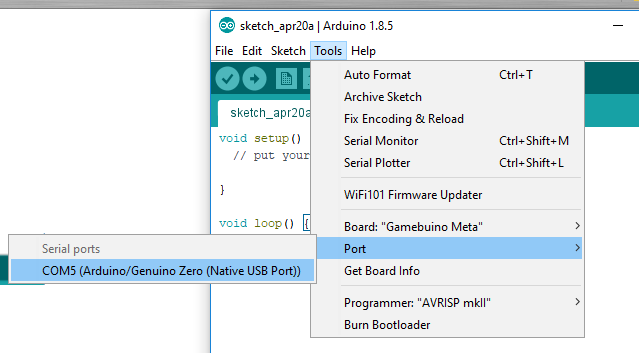
- In "Tools/Board" select "Gamebuino Meta" at the bottom of the list. If it's not there, check that you installed it correctly.
- In "Tools/Port" select "Arduino/Genuino Zero (Native USB Port)". Make sure your Gamebuino is turned ON. On Windows XP and 7, check that you installed the drivers. No drivers needed for Windows 10, Mac OS and linux.
- Erase the default code present in the Arduino IDE (Ctlr+A then Del)
- Copy and paste the code below into the Arduino IDE. Be careful not to miss a line!
#include <Gamebuino-Meta.h>


void setup() {
  gb.begin();
}


void loop() {
  while(!gb.update());
  gb.display.clear();


  // This is where most of the program takes place
  gb.display.print("hello, world");
}
- Save your program somewhere on your computer (Ctrl+S)
- Click on "Sketch/Upload" or press "Ctrl + U" to compile and upload the program to the Gamebuino
- Compiling will take a few minutes the first time. Stare deeply at your screen to help it compile faster.
- The console will reset and launch the new program. It overwrites any current program. If you want it to remain on your Gamebuino even when you switch games, you have to put it on the micro SD card. See Update and install games.
Time to celebrate, you just launched your very first program!