Tally counter
Step 2
A small game to count things, from guests to sheeps!
- What is a variable
- "If" conditions
- How to use buttons
- Draw rectangles
Discover variables, the conditional structure if and draw rectangles.
Build a program to count guests, stock, or sheep
Length 20 minutes
**Level **Complete beginner
Prerequisites
- Access to a Gamebuino META
- Completed the Gamebuino META setup workshop
- Completed the Hello World workshop
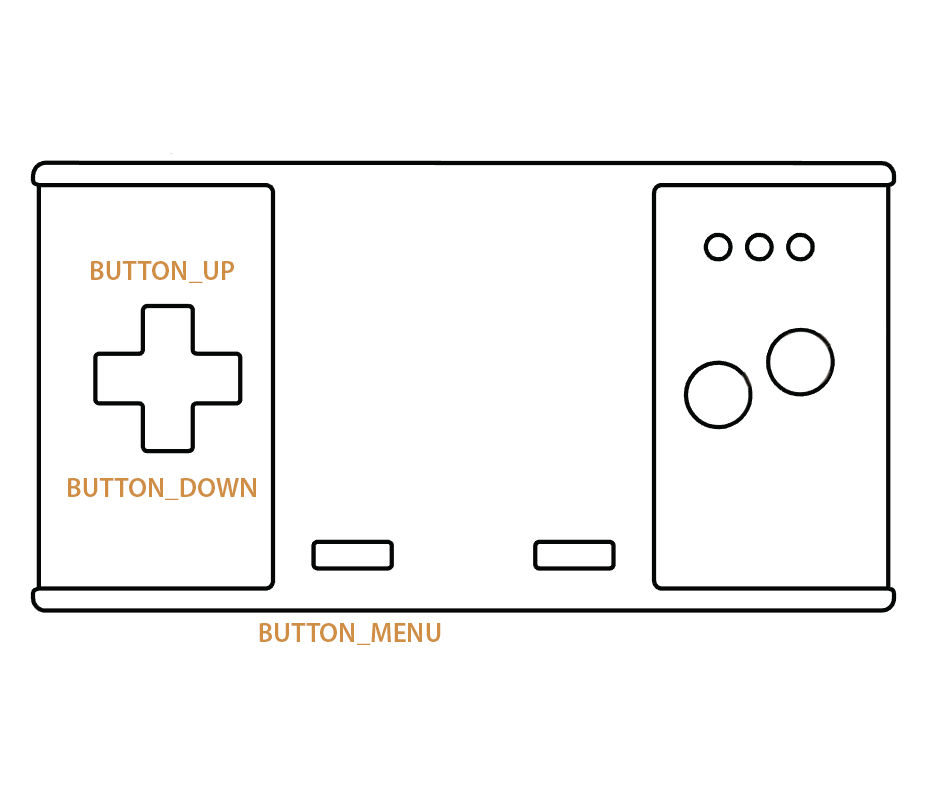
Our objective now is to build a small guest counter, that increments whenever the use presses the UP arrow, and decrements whenever the Down arrow is pressed. This counter is often found at the entrance of stadiums or events to count people. But the logic we will use can be applied in many areas of a video game, such as scores or death count. Throughout the program, we will learn how to store values in memory with variables and use conditions to handle buttons.
Variables
Let's begin with the body of our last program, "Hello, world" and making a small variation: (don't hesitate to follow along on you IDE ;) )
#include <Gamebuino-Meta.h>

int counter = 0;  // New line

void setup() {
  gb.begin();

}

void loop() {
  while (!gb.update());
  gb.display.clear();

  gb.display.print(counter);  // Something changed here :)
}
Let's take a deeper look at the changes we made.
int counter = 0;
This line declares and initializes a variable that we display later inloop
counter is a variable that keeps track of how many guests we have. A variable is used to store information in memory. It could be a score, an image, some text, or even a whole map for a platformer. Sadly, when you power off you console, all variables are lost :( Note for the curious: there is actually a way to store variables in the SD card as to not lose them! (we will learn more about this in a later workshop)
Here, we give our variable an initial value of 0with the equal operator =.
A variable has a name, here we chose counter. Choosing a descriptive name is very important, our programs can be understood more clearly by the reader and ourselves. Avoid using names like a, b or var, unless you want headaches.
A variable also has a data type. The type of variable is set at declaration, just before naming it. Here counter is an int. "Int" is short for integer, also known as whole numbers. So counter can store any integer, such as 0, 1, 5, or -34.
Here, this instruction is not placed inside of a function (functions are bounded by curly brackets {}). In C/C++, we can place instructions outside of functions, but these will only be executed once, from top to bottom. Note this does not apply to functions (instructions end in a semicolon but functions do not).
gb.display.print(counter);
We already saw how to use the gb.display.print function in the Hello world workshop. We used it with a string as its parameter. But you can also pass an ** int** as a parameter, like we have done here. This will of course print the value of counter.
if - The Conditional Structure
If you run the code we wrote up to this point, you will see a screen displaying a 0. There is no movement, no interaction. Boring right? Let's fix this right now. Before we start coding, you must understand that a variable can change value, hence the name. Also, it is good practice to write down an algorithm before we program. So I came up with this algorithm to create the guest counter:
If we press UP
Then add 1 to "counter"

If we press DOWN
Then subtract 1 to "counter"

If we press MENU
Then Reset "counter" to 0
This algorithm simply states that we control the value of counter with the UP and DOWN arrows. We can also reset its value with the MENU button. See nothing complicated right? Now we have to write the same thing, but in C++. The If ... Then ... in our algorithm translate to:
if (condition) {
  // ...
}
Rather straight forward. If the condition is true, Then execute everything located within those two curly brackets { }. Applying this to the first part of the algorithm (UP arrow), we get the following:
#include <Gamebuino-Meta.h>

int counter = 0;

void setup() {
  gb.begin();

}

void loop() {
  while (!gb.update());
  gb.display.clear();

  if (gb.buttons.pressed(BUTTON_UP)) {  // If we press UP
    counter = counter + 1;    // Add 1 to "counter"
    gb.sound.playTick();    // Play a ticking sound
  }  // End of IF

  gb.display.print(counter);
  gb.display.fillRect(counter, 8, 2, 4);  // Draw the rectangle
}
The new instructions are explained below. Since we only give you one part of the algorithm, then...
It's your turn!
It is now up to you to complete the code we started so that the two other buttons DOWN and MENU work. Do not hesitate to read over the algorithm and help yourself with the code for the UP arrow. If you ever need help with syntax, go to the Reference page (I recommend that you bookmark that page). This time I'll be nice this time and provide most of the elements you will need:
BUTTON_DOWN
BUTTON_MENU
These are the names of the two other buttons you will need.
Once that works, here is an extra little challenge: personalize your counter. Here are the functions you can use (and that are used in the given code above):
gb.sound.playTick();
This plays an predefined "tick" sound. Could be useful to make the counter feel more responsive when the player presses a button.
gb.display.fillRect(x, y, w, h);
This function draws a rectangle. It takes multiple parameters, separated by comas ,. The number and order of parameters in a function is important. If you want to read more about this function, check out its reference, but here is a quick summary:
-
xis the horizontal coordinate of the rectangle, with the left edge of the screen being 0. In the example above, ve usedcounter. -
yis the vertical coordinate of the rectangle, with the top edge of the screen being 0. Here it is8, or 8 pixels. -
wis the width of the rectangle in pixels, here2 -
his the height of the rectangle in pixels, here 4
How you use these functions is up to you! Go crazy! Try messing with the position and size of the rectangle, or how about it color? What if instead of counting guests 1 by 1, you multiplied by 2 every time.
Share your inventions on social networks with #gamebuino #tallycounter, we go through them all the time ;)
Remarks about C/C++
A computer (like your Gamebuino) can execute a huge number of instructions very quickly, but a computer is not very bright. It we do exactly as it is told, literally. So the syntax and logic of each line is rather strict. There are two types of errors: syntax errors and logic errors. Syntax errors are detected by the compiler (when you compile), who will not let you compile until it is happy. Then we have the logic errors, those get past the compiler, but things don't behave like they are supposed to when you run your game.
To fix syntax errors, reading the red text given by the compiler is crucial. Here are the most "popular" errors:
Curly brackets { }
 This is an error that a lot of beginners make. It is important to know that curly brackets come in pairs. Sometimes, you may forget to put one or type an extra one by accident. Either way, the compiler will not be happy because there will be a lonely bracket without a partner somewhere :( Here is a great feature of this IDE: if you place your cursor on an opening bracket, the matching closing brackt will be highlighted (and vice-versa). Note: all **if ** statements and functions must have brackets.
The semicolon ;
 Every instruction must end with a semicolon. This error is as easy to fix, as it is to make :P Just read over your code, and look for missing semicolons.
If you ever get stuck with an error that you cannot seam to fix, come by our discord channel for help. Even if you don't have problems, you can join the community's chat ;)
Solution Example
Here's what we came up with: (code below)

#include <Gamebuino-Meta.h>
int counter = 0;


void setup() {
  gb.begin();
}


void loop() {
  while (!gb.update());
  gb.display.clear();


  if(gb.buttons.pressed(BUTTON_UP)){
    counter = counter + 1;
    gb.sound.playOK();
  }


  if(gb.buttons.pressed(BUTTON_DOWN)){
    counter = counter - 1;
    gb.sound.playCancel();
  }


  if(gb.buttons.pressed(BUTTON_MENU)){
    counter = 0;
    gb.sound.playTick();
  }


  gb.display.setColor(BROWN);
  gb.display.fillRect(0, 0, counter, gb.display.height());


  gb.display.setColor(WHITE);
  gb.display.setFontSize(4);
  gb.display.setCursor(8,8);
  gb.display.print(counter);
}
Head to the next workshop to start you Pong game!
By Aurélien Rodot, modified by Julien Giovinazzo
Any questions / comments / suggestions, be sure to drop a comment down below!