Porting Bumble Bots
8 years ago
My first Gamebuino project will be porting my Bumble Bots game to it. I'll be sharing my progress and experiences here. This may help others who are getting started with Gamebuino. Next to that, feedback that helps me to port the game or to improve the gameplay is also much appreciated.
About the game
Bumble Bots is a game I initially created for the PICO-8 fantasy console. The PICO-8 version can be found here. It was inspired by the Rolmops game that my brother, a friend and me created during the Global Game Jam 2017. The theme that year was "waves". In both games part of the ground is moving in a wave-like fashion. This matters, as the player and enemies can only move downwards.
Porting it - Step 1: Screen resolution and colors
The PICO-8 resolution is 128x128. At first I thought that when porting to Gamebuino I would be in the luxurious position of having more pixels to work with, given that it supports 160x128. However, after reading the Quality Seal article which recommends using 80x64 and subsequently realizing that the screen size on the console is quite small, it dawned on me that it would not be that straightforward. I might have to switch to 80x64.
On the PICO-8 game each level fits completely on the screen. To comfortably see what is happening on the Gamebuino screen the level needs to be zoomed. Would the game still be playable? To find out, I modified my PICO-8 game to use only the center 80x64 pixels of the screen. Trying this out, the game still seemed playable. It had become a bit harder though now that enemies were not always visible anymore.
I also made changes to the HUD to minimize the screen real-estate it was using up and to make it stand out more from the game play, as it could now overlay part of the action. Instead of using a real-sized avatar for the lives, I used a smaller version. Furthermore, I converted the indicator for the remaining time to a bar. It uses a logarithmic scale so that it can represent a span of five minutes but still updates every second when time is nearly running out. That worked well. It can get very stressful! Finally, I dropped the permanent display of the score. I intend to only let it briefly show up when it changes.
Finally, I experimented with using the official Gamebuino color palette. It resembles the PICO-8 palette in that both have sixteen colors. There is no direct one-on-one mapping between the colors though, so converting the sprites is not an automatic process. For example, the enemies will get a different look. They used to be purple, but keeping them this color in the Gamebuino palette cannot be done while preserving the red taillight. I am pleased with the initial result, especially the colors of the checkerboard floor. Judge for yourself though.
Original PICO-8 game:

Gamebuino mockup: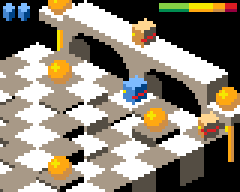
Porting it - Step 2: First results and two findings
The first week since I received my Gamebuino has been a productive one. Getting some code running was easy. I quickly managed to show the sprite for the player bot, and could rotate it via the controls. The next step was using the same sprite to create an enemy bot. At first, I did not see if how it was possible to change the palette for an image, but after some help, it was not difficult.
The next step was creating the tile-based environment for the bots to move in. This required porting a decent portion of the code. It took some time before I had enough in place to try running it. Unfortunately, this resulted in a crash. After reading some more about how to debug this and coding for Gamebuino and Arduino in general, I realized I had followed the wrong approach. It was based too much on the PICO-8 implementation.
The PICO-8 has quite harsh limitations. I had naively assumed that the restrictions for the Gamebuino would be similar. Many restrictions indeed are, such as resolution, available colors and code size. But there are at least two significant differences.
Firstly, PICO-8 lets you freely create objects and in practise there are no memory limits. This is entirely different for the Gamebuino. Here you should avoid dynamically allocating memory and only store data in RAM that needs to be modified. Where possible, keep data as part of the code. This holds for images, but also palettes, level definitions, etc. My initial code was dynamically creating many objects and unnecessarily putting data in the very limited RAM memory. For example, on start up it dynamically created several palettes based on the default one but with certain colors swapped. This could be coded succinctly, but unnecessary used up space in the RAM. I refactored the code to specify each palette as constant data. This results in bigger and less-flexible code, but avoids "wasting" RAM. After refactoring other parts of the code along similar lines, it ran successfully.
This revealed the second big difference with the PICO-8. The latter has a default frame-rate of 30 frames per second and this was easy to reach. CPU load when running Bumble Bots on PICO-8 is around 40%, even though PICO-8 artificially slows down code execution, to simulate a more limited, console-like environment. In contrast, the default framerate on Gamebuino is 25 frames per second but my initial code was not even able to meet that. I suspect this is caused by the many images that need to be drawn to create each frame. As the tiles move, the environment needs to be fully redrawn each frame. Furthermore, to create the 3D appearance, the images for the tiles overlap, which requires more pixels to be drawn compared to a standard 2D view.
So, can anything be done about the low frame rate, and if not, would that be an issue? I doubt if it is possible to drastically speed up my current code as it is not doing much more than drawing images. Maybe there is a trick to drawing images faster, if so, I would be eager to hear this. Having said that, a lower frame rate may not be a problem for Bumble Bots. The game does not feature fast movements. For example, it has no fast moving objects. The bots only move in small steps. In fact, in the original code, it required two frames for a bot to move one pixel. So, there's some room there. For now, I think/hope the game is still playable at a lower framerate.
I will share the code and game once it has progressed a bit more. For now, here's a movie of the game in its current state.

Porting it - Step 3: Improving performance
To improve the performance, I refactored the code in two areas. The first area is the drawing of images. It was possible to reduce drawing time by using the images more effectively. The first step was to reduce the number and size of images that require transparency. The figure below shows an example. Image 1 is the original image where blue indicates transparency. To create a 3D effect, transparency is only needed for the top part of the image. For the bottom of the image, there will (typically) be nothing behind it that needs to be preserved. So I split the image in two parts, as shown in Image 2. The top image requires transparency. The bottom image can be drawn without transparency, which is much quicker.

Most of the bottom part of the image will actually be obscured by tiles in front of it. So it is possible to optimize further by decreasing the size of the bottom image. The result is shown in Image 3. By the way, certain maps in the game may require higher tiles. This can then be realized by created a dedicated, larger bottom image as needed, and only use this where required. This gains performance at the cost of using a bit more program memory.
The second area of improvements was removal of floating-point calculations. At this stage, the game featured two levels: one with moving waves and one without. CPU load was significantly higher in the level with the wave calculations. The reason was the use of the cosine function, and subsequent floating point operations on the result to attenuate or amplify the height of the waves. In this game, there is no need for very accurate values. So I replaced the floating-point calculations by integer-based ones. Furthermore, I replaced the usage of the cosine function by a static look-up table. A table with 32 one-byte integer values sufficed.
Together these improvements significantly reduced the CPU load. It was now possible to go from 20 FPS to 25 FPS. CPU load at 25 FPS is now around 80%, so there even is some breathing room. Hurray! So it looks that not much is in the way of making this game reality on Gamebuino, only coding effort...
Porting it - Step 4: Sound effects
The way sound effects are defined in Gamebuino is quite similar to how this is done in PICO-8. You specify individual notes, using a certain waveform, and with a certain volume. There are several differences though. Out-of-the-box PICO-8 includes more instruments (waveforms). Gamebuino's library currently only supports square wave and noise. PICO-8 has six additional instruments.
A second difference is that Gamebuino models sound effects differently. It supports volume and period sweeps. PICO-8 effects are defined at higher level but most can be modelled in Gamebuino. PICO-8's Fade-in and Fade-out can be realized via a volume sweep. PICO-8's Slide and Drop can be modelled as period sweeps. PICO-8's Arpeggio can be realized by simply repeating the same sequence of short notes. The only effect which I think cannot be achieved in Gamebuino is Vibrato.
A third difference is that PICO-8 features a built-in sound editor, whereas in Gamebuino you have to specify the sound effects in code. Fortunately, Valden created GSFX GUI, a sound effect editor on the Gamebuino. It enables you to create and tweak sound effects and directly hear them. Once you are happy with the sound, it lets you export it via the Serial Monitor. Using this tool I was able to recreate the sound effects from the original game for the Gamebuino. They are similar but do not sound the same, mainly due to the difference in instruments, but I am happy enough with the result.
See also
- Bumble Bots - Here you can find the actual game
NEW 8 years ago
A first version of Bumble Bots is now available for download! It is still a work in progress, but definitely playable. It features four levels. Can you complete them all?
NEW 8 years ago
When I get my Gamebuino Meta - probably next week for sure I will play and test it !! :D. It seems like a great game :D
NEW 8 years ago
This game plays quite nice so far! I haven't gotten past the third level yet, but I think I'll be able to get there with enough tries. It seems like some tactics are needed to lure the bots around the moving tiles and keep distance from them. I like how the bots look stunned when hitting a wall and how the Meta lights up with warning flashes as time starts running out. The time meter is well-done too.
The raised tiles on the corners of the moving tiles in the center of the third level don't seem clearly elevated at first glance. I unsuccessfully tried to directly get on the one near the spawn position a couple of times when I first started the level.
eriban
8 years ago
Thanks wuuff for the feedback. Yes, you need to work out a tactic to complete the third level (as well as later ones), but there's more than one way to it though. I found two different tactics for level three which both work quite well. There may be more.
Having said that, this game is not easy. It may be a bit frustrating to get to a new level only to die relatively quickly. So one of the next things I will add is a menu that lets you start the game at any level that you have reached so far, which should help. With that in place, I do not think the raised tiles need to be indicated more clearly. You'll discover it quickly enough, and being able to immediately retry the level after Game Over makes it less of a big deal.
NEW 8 years ago
Thanks wuuff for the feedback. Yes, you need to work out a tactic to complete the third level (as well as later ones), but there's more than one way to it though. I found two different tactics for level three which both work quite well. There may be more.
Having said that, this game is not easy. It may be a bit frustrating to get to a new level only to die relatively quickly. So one of the next things I will add is a menu that lets you start the game at any level that you have reached so far, which should help. With that in place, I do not think the raised tiles need to be indicated more clearly. You'll discover it quickly enough, and being able to immediately retry the level after Game Over makes it less of a big deal.