Controls: D-Pad: [Arrows / WASD] - A: [J] - B: [K] - Menu: [U] - Home: [I]
Enjoy games at full speed with sound and lights on the Gamebuino META!
Emulator by aoneill

While I added a fully working game (Firebuino Meta port! Thanks Jicehel, Krabbo, Sorunome and Steph in alphabethical order) to this creation, the creation is actually meant to be a tutorial for how to port a game from Gamebuino Classic to Meta. (The creation for the game you can find over there: https://gamebuino.com/creations/firebuino) It addresses several things which are not part of the reference and might help aspiring game developers to do their first steps after finishing the academy.
Update: I have started migrating the tutorial to a github page, not much new to be seen there, though:
https://makersquirrel.github.io/gamebuinoTutorials/portFirebuino/portFirebuinoTutorial.html
Some highlights which will be addressed:
- git, github and git extensions: why use versioning systems, what are their advantages
- using a diffferent IDE than the standard one
- how to do a proper port
- how to save and store highscores
- how to port images, how to animate them
- LEDs
- Sound
Get the game:
So how to port a classic game?
Of course you have already read Auréliens tutorial, he wrote about this topic: https://gamebuino.com/creations/port-games-from-classic-to-meta
There you already find a huge stash of gamebuino classic games which wait for you to port them to the Meta.
But what is not mentioned there is that doing a full port is actually not much more complicated than the compatibility mode port - and as a side effect it does not maneuver you into a dead end since the compat and eeprom libraries there won't help you developing new games for the Meta.
Doing a full port means handling images by yourself, storing saves by yourself and doing your own music samples (or get free ones from one of the various websites).
But first, let's get the game:
https://github.com/ladbsoft/makerbuino-firebuino
Since you should always work with backups, git and in this case github allows you to protocol what you are doing and backtrace mistakes you made. This information is stored in a repository, like the one linked above. This is not a bonus for programming, but an essential part of projects with more than a few lines. This is not only relevant for programming but for other projects like diploma thesises and such, so investing a few minutes into learning the basics of version control systems are minutes well invested - see your older you just looks back to you at this moment and agrees with me completely!
So go to github and create yourself an account, chop chop!

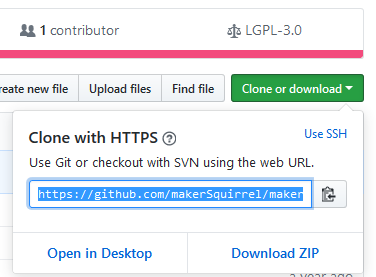
While you were getting your account, I already have forked the game by simply clicking on the fork button (marked green) and waiting a few seconds:
https://github.com/makerSquirrel/makerbuino-firebuino
Forking creates a full copy of the original game made by LADBsoft. Since he shared it with a LGPL licence I was allowed to fork it and modify the code.
After getting the game to my github account, I cloned it to my computer (which is just another fancy word for copying the repositories' content to your PC. The main difference between forking and cloning for you is that a fork copies the project and makes the copy your project, while a clone typically is made, when you intend to give something back to the repository. You can not give something back to LADBsofts original repository without him allowing you to do so, but in your fork, that's your beer now). Github gives you several nice ways to clone a project:
(i.e. simply copy the command and put it into your bash on Linux, terminal on MacOs or whatever you have downloaded as a substitute on Windows). I like using Git Extensions (https://gitextensions.github.io/) for that and therefore show how to do it there:

A tool like git extension allows you to see all versions stored in the repository, allows me to compare any version with any other version, go back and forth in time, i.e. go back 3 versions, start changing stuff from the code back then, put it in its own timeline (called branch) and do whatever you like then. This you can do in command line as well, but here you get nice pictures and better explanations.
So to not overcomplicate things, let's simply use the tool to protocol our progress and to check changes. So no new branches are needed now, just the main branch, typically called "master"
So how does this fancy master branch look like? How should anyone care?

This is my current state of the firebuino project. In the bar at the top(1), I can see the (from left to right): refresh button, blue arrow for going to another repository (irrelevant for us), the filepath, the branch name (master), some more stuff we can currently ignore and the following really important things:
 This tells me that I have untracked changes (2 files), which I can commit to my branch
 with the blue arrow pointing upwards I can upload the files to github (called pushing), or get files from github (pulling, the arrow pointing downwards). In this tutorial, we will push a lot, but pulling is only relevant if more than one person is working on a project.
So what's so fancy about that?
See these red knobs connected on the red line near (2)? These are commits stored on the branch. These commits are like save games made while playing a game; let's say you have been running for hours through a dungeon and then you took a wrong turn without noticing and after another hour of playing you face a secret end boss while you being level 3 instead of level 99 and no potions are left? This is when you wished that you have saved back then. And now guess what, these commits do exactly that! They not only save the last state like a normal file save is doing, but any change you like, and you can give the saves names which tell you later what actually was saved!!! But it gets even better: near (5) you can see which files changed at selected commit, and near (6) it exactly tells you what changed compared to the previous commit!!!11oneleven! As you can guess from looking at the screenshot, you can even see each single step what LADBsoft did to be able to develop this game(!) (btw, this commit information you got because you did clone the repo, including its history, not only downloaded the files)
Well, if you didn't get exited like me in the last paragraph, simply think of doing the dungen for days or even weeks after taking the wrong turn, without making any saves. I have been there, like many wretched programmer's souls before me (and some never came back). So please do your future self a favor and invest a few minutes in installing git extensions or a similar program.
And as a small sneak peek: there is even more awesome stuff you can do with git: [please pause here for a moment and think of your most favorite, off-screen narrator saying the following words with pathos] you can change history!!!
Although not only the physicists among you will now scream in rage, that it is not possible to travel back in time to change history, let me state here that with git you can; I will even prove you that in this tutorial!
but now, something completely different first:
Care for your (integrated development) environment!
Whoah, so much done already and still no line coded?! Yop, coding is not for wussies (80's styled games call for 80's styled words. yay.), we stay strong and do even more before actually coding something! We switch the IDE for Arduino, since there is not much more pain in the ... backside .. than this IDE. Luckily it is easy to do that, just go into the settings of the arduino IDE and set it to "use external editor"
I only use the Arduino IDE for building and exporting the binaries, and even that is not needed after switching to something more useful: the Atom editor: https://atom.io/ It is lightweight and can be extended i.e. with Sorunomes arduino extension (https://github.com/Sorunome/arduino-upload) - a small tool with the extra pony power (ba-da-ching!)! Of course you can use VSCode (https://gamebuino.com/creations/install-arduino-on-vscode) , use the arduino makefile project (https://github.com/sudar/Arduino-Makefile) or the Arduino IDE instead. Even MS Notepad can be used if you think nano or vi (not vim, vim is mainstream like emacs! :P) is too comfortable for you! But in that case you may not expect pitty from my side...
(Sidefact: since Atom and github are siblings, using github with the Atom is pretty easy. The cool guys and girls in our forum can tell you about it - but not me, though, since I am not cool and stick to Git Extensions :P ...)
So why is Atom fancy and the Arduino IDE is not?
Short version: many missing features, which will make your life easier, i.e. a search function also finding things where you only roughly know how you named them, customizable short cuts and most important of all: upgradeable with tons of plugins/packages. More details here: https://scotch.io/bar-talk/best-of-atom-features-plugins-acting-like-sublime-text
Let - me - code!
Finally we can start working with the code files: we copy the FIRBUINO.ino file and the graphics.ino into a new directory called Firebuino, then we rename FIRBUINO.ino to Firebuino.ino (same name as directory, which stops Arduino IDE from complaining).
Then let's start the Atom editor, where we conveniently open not the ino file, but the full directory:
The easiest way to do this the first time is to start Atom and open the folder, which loads all files in it:

before starting to code anything new, let's do some easy search-and-replace steps where we replace several snippets with more correct ones:
- byte -> uint8_t [byte is not official C++ and I always forget if it is signed or unsigned, so replace it with a type that is less nice to look at, but more informative]
- short -> int16_t [short is short for short int, but again it is nicer to know for sure that it is an 16 bit integer]
- boolean -> bool [boolean is arduino jargon again, whyever someone thought it is better than bool, beats me...]
- PROGMEM -> [nothing, no one needs PROGMEM on an ARM CPU!]
- BTN_ -> BUTTON_ [this converts all button macros to the meta compatible versions]
Then we start with some actual porting, just do what STUDIOCRAFTapps wrote in the WHEN PORTING OVER TO META section of his tutorial: https://gamebuino.com/creations/facepalm-center .
Hey, we replaced the includes (don't forget to add #include <Gamebuino-Meta.h>), removed the gb.titlescreen() and gb.battery.show(), so are we done now? can we go home and be proud?
Nope.
We have to remove all the highscore related stuff yet, since it uses EEPROM (this is how the classic stored its game saves) which - as mentioned in the facepalm center - does not work on the Meta anymore. For now, just comment out all lines within the functions containing "highscore" in their name. (Funfact: Firebuino - like many classic games - just used R0d0t/Auréliens Crabator code for the Highscore. This is neat for us, since we have to solve the highscore-riddle only once and then can recycle the solution over and over).
Then we have to add the LCDWIDTH and LCDHEIGHT macros again (or better: replace all macros with the actual function calls).
#define LCDHEIGHT gb.display.height()
#define LCDWIDTH gb.display.width()
After that we have to convert the old menu to a working one. I show that with the diff-tool which is part of git extension, the red parts starting with a minus sign are the old code parts, the green ones starting with a plus sign are the new ones and the white ones will stay untouched:
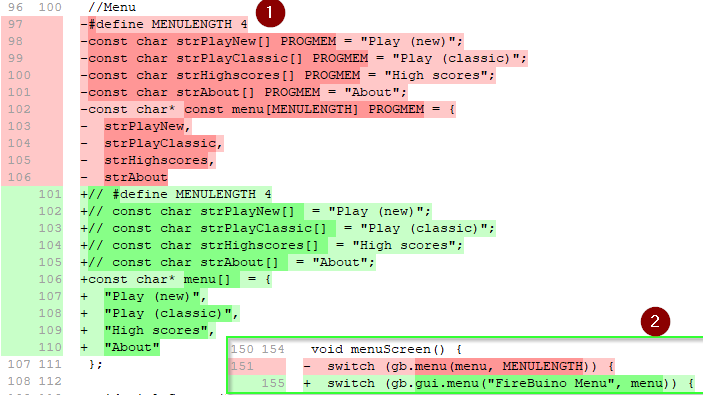
My version then already compiled at that point and could be tested using aoneills online emulator: http://games.aoneill.com/meta-emulator/
This made clear another difference between the classic and the meta: gb.display.clear();must be called in the loop function to clear the screen.
Compiling means it is done, yes?
No. The real work starts now!
(Well actually after we save what he have achieved so far, phew!)
Now it is time to do a commit in git. For that simply open git extensions again, where you see something like  in the tool bar, click on it and then you see all files listed which have changed (the changes you can see in the green(new)/red(old) lines on the right hand side), simply write an explaining message in the field on the lower right and press the small icon on the left side:
  This means that you want to store all file changes in this commig (click the single stage button if you do not want to add all files). after that you can commit and that's it, you have saved your state!
Where do we go from here?
Well since it is late in my part of the world, I go to bed and will continue this tutorial soon ( I promise!), you go wherever you like :P
just a quick forecast: I will talk about porting images, splitting code into multiple files, .h vs .cpp vs .ino, the benefit and dangers of const (thanks, Steph!), how to solve the "Highscore" problem once and for all, how to animate images, how to use the leds and finally how to make some sound. All-in-all that shouldn't take more than 500 pages or so O.O
Version history:
- v0.1: inital commit Nov 6 -2018
- v0.11: minor adaptions, add link to game creation
- v0.12: better explanation of the git thingy (Get the game chapter) and how to commit stuff in git (Let - me - code chapter)
- v0.13: add Github pages link: https://makersquirrel.github.io/gamebuinoTutorials/portFirebuino/portFirebuinoTutorial.html
Nice link I keep for later: