Setting up
Step 2
Script installation on the console.
Introducing functions.
Installing game engine.
Notions of colorimetric spaces.
Definition of the spatial reference frame of the META.
Introducing global variables.
Initialization of the graphical rendering engine.
Script installation
We will start by creating the game script and saving it directly to the Gamebuino as described in the discovery workshop in the section Run your first program. I'll leave it to you to check how to proceed if you have memory leaks...
Here is the bootstrap script code.py:
from gamebuino_meta import waitForUpdate, display, color, buttons

# ----------------------------------------------------------
# Main loop
# ----------------------------------------------------------

while True:
    waitForUpdate()
Once saved in the CIRCUITPY volume, your META screen turns all black.
Note
The
#symbol allows you to prefix comments in your code. Everything after this symbol, and on the same line, is not interpreted and therefore cannot be executed. Comments can help you clarify in your code to explain in which area you are in, or to describe what this or that portion of the code does, and why you defined things that way... It can make reading your code a lot easier when you have to share it with others, or even for yourself, when you come back in 6 months and you will have completely forgotten why you did it that way! So don't hesitate to comment on your code.
Setting up a scheduler
To properly organize your code with Python, I encourage you to group instructions that participate in the same task into a function. A function is a block of instructions that you can then call at the appropriate time, much like a procedure that describes the task to be performed.
The general syntax of a function in Python is as follows:
def functionName(list of parameters):
    sequence of instructions to be executed
The declaration line of the function (the first line) must end with the : symbol, which allows you to enter the block of instructions that make up the body of the function. Note the indentation of the instructions in the body of the function. It is necessary for the Python interpreter to be able to determine that these instructions are part of the body of the function.
A function can accept a list of parameters (also called arguments). This list can also be empty, if the function does not expect any particular parameter.
Main control loop
We will create a first function that will allow us to schedule the main tasks to be performed at each execution cycle of the program.
The script has an infinite loop that runs indefinitely, as long as the program is running:
while True:
    waitForUpdate()
As with functions, the block of instructions to be executed is announced by the symbol : and is indented.
You will notice that the loop already has a call to the waitForUpdate() function, which does not take any parameters, and which waits until the graphic display executed at the previous iteration is finished before giving you back your hand so that you can execute your code and perform a screen refresh.
Iterations are performed at a frequency of 25 fps (frames per second). In other words, in one second, 25 iterations are performed. So, each iteration has 40 ms (1000 ms / 25) to execute. If the execution time of an iteration exceeds 40 ms, the overall application flow is automatically slowed down. This phenomenon is perceptible on the display... you will see that "it lags".
Well, let's start by defining our own function, which will be in charge of scheduling the different tasks to be performed for the game progress. Let's call it tick:
def tick():
    display.clear(color.BROWN)
Here, the tick() function simply erases the screen by applying a brown background color.
And to ask our scheduler to run each iteration of the main control loop, it will be enough to call the tick() function:
while True:
    waitForUpdate()
    tick()
Colorimetric spaces
There are some predefined colors that you can use. I refer you to the documentation concerning the official color palette for the META. This documentation targets the C++ language, which is the default language used to program on the Gamebuino, but the list of available colors is the same in Python.
You will find the definition of the BROWN color, which corresponds to #CF8E44 hexadecimal color code in the RGB888 colorimetric space. An RGB888 color is defined from the 3 primary colors Red, Green and Blue, and is encoded on 3 bytes: 1 byte that indicates the intensity of the red color level, 1 byte for the green and 1 byte for the blue. Each byte has 8 bits (which can each be set to 0 or 1) and can therefore encode 28 different values, i.e. 256 values. If these values are characterized by integers, each integer is therefore between 0 and 255 (between 00 and FF in hexadecimal notation). If we combine the 3 bytes that encode the intensities of the 3 primary colors, we obtain 2563 = 16 777 216 combinations, in other words: more than 16 million colors.
Actually, META is not able to display 16 million colors. The colorimetric reference frame is not RGB888, but RGB565. With RGB888 we had 8 bits per primary color (red, green or blue). With RGB565, only 5 bits are available for red, 6 for green and 5 for blue. In other words, the number of possible combinations corresponds to 25 x 26 x 25 = 216 = 65 536 colors. So much less than in RGB888! But it's not bad...
Then, how to convert a color from RGB888 to RGB565?
As it is a little beyond the scope of this workshop, I prefer to provide you with a small automatic converter to allow you to do this operation:
Try to convert the BROWN color hexa code for example (#CF8E44). You should get 0xCC68 as RGB565 color code. The 0x prefix simply indicates that the integer is expressed in the hexadecimal base.
You can use any RGB565 color in your script. For example, you can replace the following instruction:
display.clear(color.BROWN)
with:
display.clear(0xCC68)
You will get the same result on the screen, since the BROWN color code is used here. But replace the hexadecimal code with another color and you will see that the result will be different.
For the background color of our game scene, we will use a slightly different brown color: 0x69c0.
Well, we're also going to delimit the playground enclosure that the snake shouldn't cross. It will be represented by a simple orange rectangle, using 0xed40 color code:
def tick():
    display.clear(0x69c0)
    display.setColor(0xed40)
    display.drawRect(0, 0, 80, 64)
You see that after erasing the screen with one color, if you want to draw a shape with another color, you must specify it with the display.setColor() function. Here we simply draw a rectangle with the display.drawRect(x, y, width, height) function, which accepts 4 arguments: the (x,y) coordinates of the upper left corner, as well as the width and height of the rectangle.
Spatial reference frame
As we are going to make graphical plots on the screen, we will need to find ourselves easily in space to be able to position the different game elements. The META screen has 80x64 pixels, and its spatial reference is as follows:
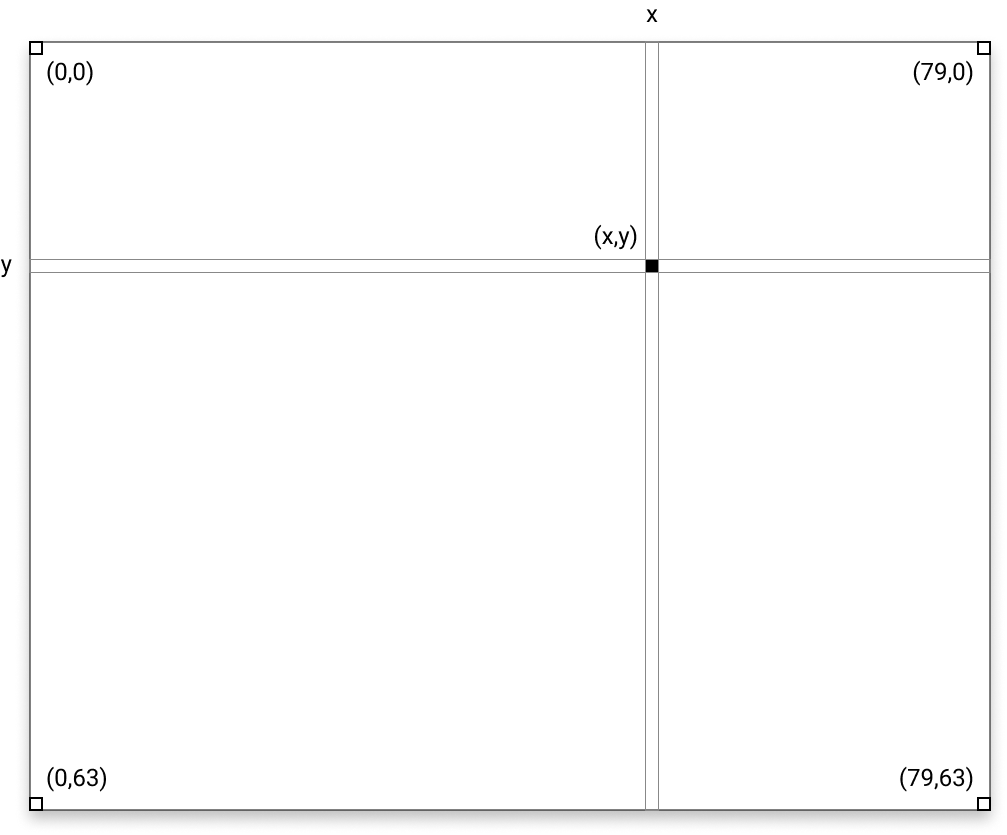
The spatial origin (0,0) is located at the top left, and each pixel is characterized by (x,y) coordinates where:
- x varies in [0,79] interval
- y varies in [0,63] interval
To position the different elements of the game, it will be necessary to perform calculations using the screen dimensions. It may therefore be useful to declare global constants at the beginning of the program to define these values once, and refer to them in our calculations. With Python, the notion of constant does not exist... so we will use global variables that will act as constants. And to properly identify them, they will be uppercased:
from gamebuino_meta import waitForUpdate, display, color, buttons

# ----------------------------------------------------------
# Global variables
# ----------------------------------------------------------

SCREEN_WIDTH  = 80
SCREEN_HEIGHT = 64
COLOR_BG      = 0x69c0
COLOR_WALL    = 0xed40
You see that I took the opportunity to also declare the colors that will be used as global variables. This way, if you want to change their values tomorrow, you can do it more easily, without having to look in your code where you used them.
We can modify our tick() function so that it is now based on these global variables:
def tick():
    display.clear(COLOR_BG)
    display.setColor(COLOR_WALL)
    display.drawRect(0, 0, SCREEN_WIDTH, SCREEN_HEIGHT)
You see that the code is much more explicit when it is written in this way.
And finally, all the instructions that make up the tick() function are for the moment entirely dedicated to displaying the game scene. But we will add other tasks later on, so it would be appropriate here to gather all these display specific instructions in a dedicated function, which we could name draw() and call directly from the tick() function:
# ----------------------------------------------------------
# Game management
# ----------------------------------------------------------

def tick():
    draw()

# ----------------------------------------------------------
# Graphic display
# ----------------------------------------------------------

def draw():
    display.clear(COLOR_BG)
    display.setColor(COLOR_WALL)
    display.drawRect(0, 0, SCREEN_WIDTH, SCREEN_HEIGHT)
You can see that the code is beginning to be structured by clearly showing the organization and semantics of the tasks to be performed. It is important to properly name your functions and variables so that you can easily understand what they do or what they are used for.
Well, in the end, here is the complete code that we get and that completes this implementation step (use the scroll bar to scroll through the entire code):
from gamebuino_meta import waitForUpdate, display, color, buttons

# ----------------------------------------------------------
# Global variables
# ----------------------------------------------------------

SCREEN_WIDTH  = 80
SCREEN_HEIGHT = 64
COLOR_BG      = 0x69c0
COLOR_WALL    = 0xed40

# ----------------------------------------------------------
# Game management
# ----------------------------------------------------------

def tick():
    draw()

# ----------------------------------------------------------
# Graphic display
# ----------------------------------------------------------

def draw():
    display.clear(COLOR_BG)
    display.setColor(COLOR_WALL)
    display.drawRect(0, 0, SCREEN_WIDTH, SCREEN_HEIGHT)

# ----------------------------------------------------------
# Main loop
# ----------------------------------------------------------

while True:
    waitForUpdate()
    tick()
This is the display you should get by running this code on your META (just save the code.py script on the CIRCUITPY volume):

Note
Throughout this workshop, don't forget to regularly save your
code.pyscript. Typically, every time you define a new function. Also make copies of the script on your computer, because it can happen that the volumeCIRCUITPYis savagely ejected... and you would lose all your code if you didn't make a copy of it first... So get into this habit right now, before the code becomes more consistent.